Cocktail Installation to Azure on mac,linux
Azure cloud에 Cocktail를 설치하는 과정은 다음과 같다.
사전준비
설치 전 아래와 같은 프로그램들이 미리 설치 되어 있어야 하며 설치 되어 있지 않을 경우 에러 메시지가 발생한다.
1) 제공받은 cube 바이너리를 어느 디렉토리에서든 사용할 수 있도록 환경변수 path 설정을 한다.
2) Docker 다운로드 후 설치
https://store.docker.com/editions/community/docker-ce-desktop-windows
3) Azure 계정 및 application 과 관련된 값들을 아래와 같이 조회해서 메모해 놓는다.
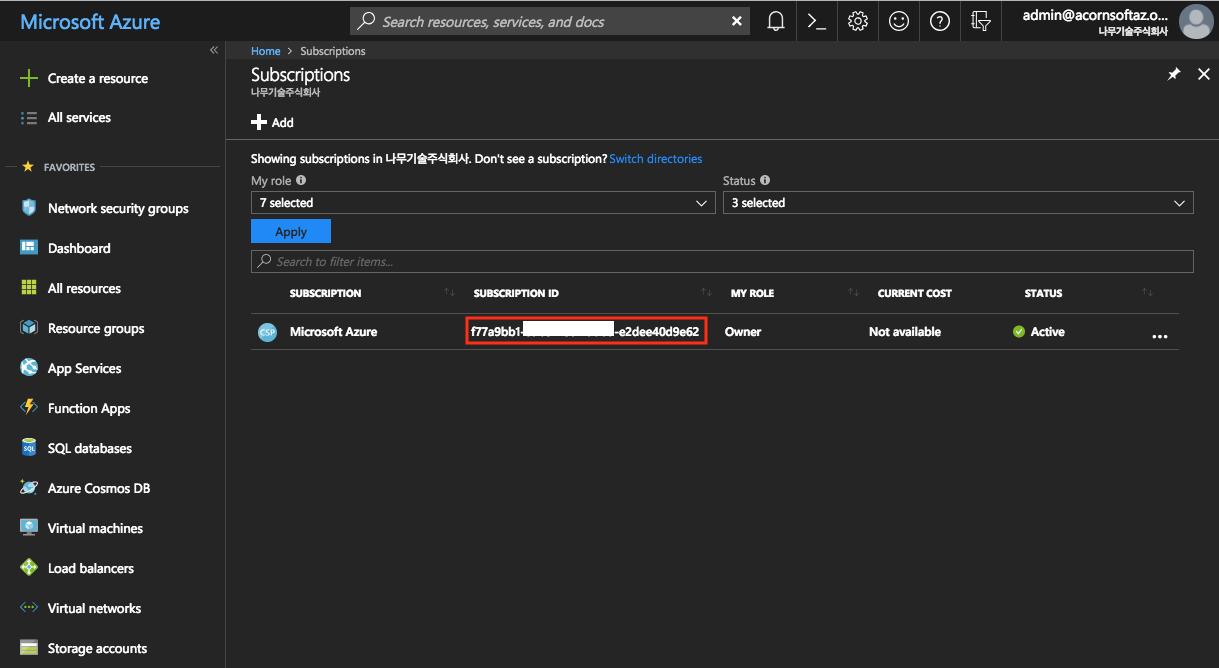
- Subscription_Id : Home > Subscriptions 화면에서 subscriptionID값을 확인
- TenantId : Home > Azure Active Directory > App registrations > Endpoints > OAUTH2.0 AUTHORIZATION에 포함된 값 중 아래 예시와 같이 x로 표시된 부분이 TenantId 임.)

(EX : https://login.microsoftonline.com/xxxxxxxx-xxxx-xxxx-xxxx-xxxxxxxxxxxx/oauth2/authorize )
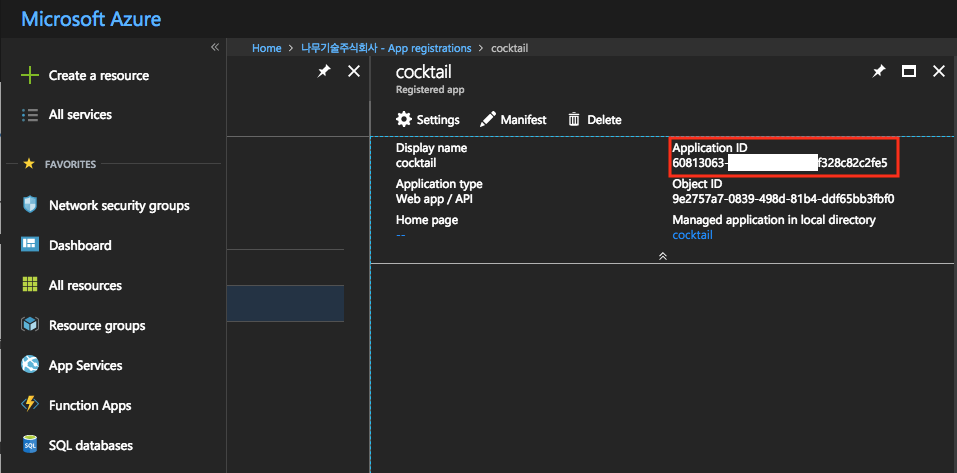
- ApplicationId 등록하여 clientId 값 구하기
Home > Azure Active Directory > App registrations 에서 +New application registration 메뉴 선택.
Application Type을 Web app/API로 선택하고, Sign-on URL(제공하는 서비스 URL) 예. http://cocktail.acornsoft.io 로 입력
아래 화면과 같이 등록된 application 상세 화면에서 Application ID가 clientId 값임.
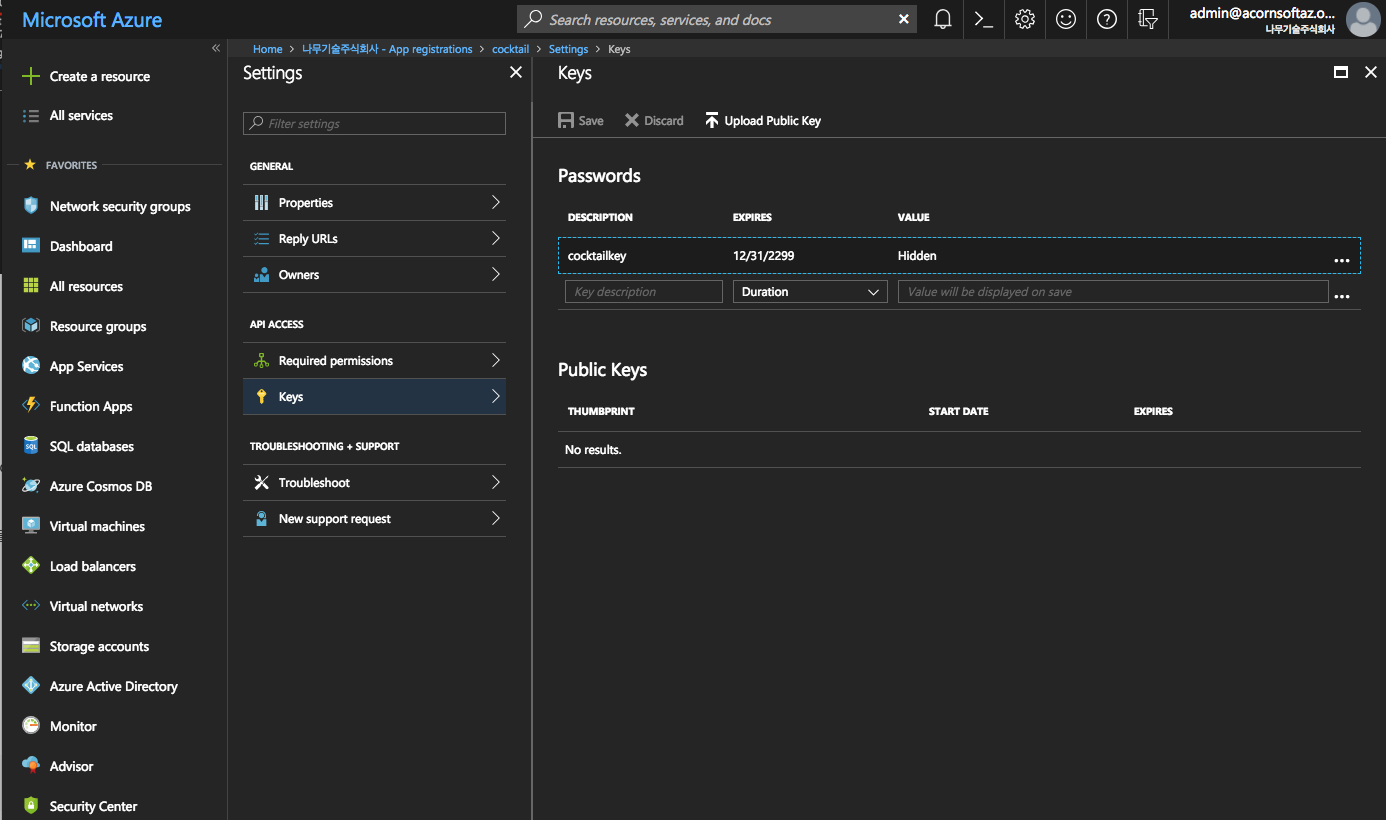
- client_secret 값 구하기
Home > Azure Active Directory > App registrations 에서 상기 등록한 application명을 선택하고 상단의 Settings 버튼 클릭
Keys 메뉴를 선택하고
description: cocktail_key
expires: never expires을 선택하고 저장버튼을 클릭하면 자동으로 value값이 표시되는데 이 값이 client_secret값임.
- application에 permission 설정하기
Home > Subscription 메뉴 선택 > 등록된 계정 선택 > Access Control(IAM) 화면의 상단에서 +Add 버튼을 클릭ㅤ
Role: Contributor 선택
Assign access to: Azure user, group, or application 선택
Select: 상기 등록한 application명을 입력
설치
1.설치를 위해 빈 디렉토리를 만든 후 해당 디렉토리로 이동한다.
  # mkdir /Desktop/azure
  # cd /Desktop/azure
2.cube 명령을 이용하여 azure용 설치 script를 download 받고 초기화 한다.
# cube init -p azure
3.cube.yaml 파일을 편집기로 열어서 설치하고자 하는 Azure 정보 및 인스턴스 정보를 기입한다.
---
cloud_provider: "azure"

# (required) The location string.
location: "koreacentral"

# (Required) It used as resource group name and prefix to all resources
# alphanumeric characters, periods, underscores, hyphens and parenthesis allowed
resource_prefix: "cube-v198-01"

# (optional) Instance size for the master node(s). Default: Standard_F2s.
master_vm_size: "Standard_F4s"

# (optional) Instance size for the worker node(s). Default: Standard_F2s.
worker_vm_size: "Standard_F2s"

# (required) The number of master nodes to be created. Example: 2
master_node_count: 1

# (required) The number of worker nodes to be created. Example: 3
worker_node_count: 1

# (required) Storage account type. Example: Standard_LRS
storage_account_type: "Standard_LRS"

# (required) ssh username to access server.
ssh_user_id: "cocktail"

# (required) Absolute Path to an SSH private key file to access server.
private_key_path: "/path/to/ssh_private_key"

# (required) Absolute Path to an SSH public key file to be provisioned as the SSH key.
key_path: "/path/to/ssh_public_key"

# Kubernetes
k8s_version: "1.9.8"
cluster_name: "cube"
domain_name: "acornsoft.io"
addons:
  ingress: true
  monitoring: true
  logging: true

# (required) cocktail service
cocktail: true
상기 항목에서 private_key_path 와 key_path 는 서버에 ssh key로 접속하기 위한 private key와 public key의 경로를 기입한다. 이미 존재하는 경우에는 해당 경로를 기입하면 되고, 신규로 생성할 경우에는 아래 절차대로 실행하면 된다.
< ssh key 신규 발급 방법 >
# ssh-keygen -t rsa
Generating public/private rsa key pair.
Enter file in which to save the key (/Users/cloud/.ssh/id_rsa): /tmp/cubetest/id_rsa
Enter passphrase (empty for no passphrase):
Enter same passphrase again:
Your identification has been saved in /tmp/cubetest/id_rsa.
Your public key has been saved in /tmp/cubetest/id_rsa.pub.
The key fingerprint is:
SHA256:liTKyW/l3eU9+mBzyksL0AKpYXRsvsQ793nWJiUgJC0 cloud@Clouds-MacBook-Pro.local
The key's randomart image is:
+---[RSA 2048]----+
|     ....        |
|    . .E.o       |
|     o=o=        |
|   o.oo*.o..     |
|    =.. So... .  |
|     . B oo. + o |
|      o + o.o==o.|
|     .     o=+Bo.|
|            o*=. |
+----[SHA256]-----+
4.cube create 명령을 이용하여 cocktail을 설치한다.
# cube create
5.오류없이 설치가 완료되면 master 장비에 ssh로 접속하여 cocktail-system를 구성하는 컨테이너가 정상적으로 기동하는지 확인한다.
# ssh -i ~/cube/pki/id_rsa root@{master1_ip}
# watch -n1 "kubectl get pods -n cocktail-system"ㅤ
6.cocktail cloud 접속 url 확인.
Master node에 접속하 해당 명령을 이용하여 cocktail 홈페이지 url과 port를 확인 할 수 있다.
# kubectl get service -n cocktail-system -o wide | grep cocktail-client-loadbalancer
Namespace를 cocktail-system으로 선택하고 Services메뉴에서 cocktail-client-loadbalancer를 선택한다.
삭제
더 이상 필요하지 않을 경우에는 아래 명령으로 삭제할 수 있다.
디폴트로 옵션을 주지 않는 경우에는 생성한 k8s cluster만 삭제하고 설치 스크립트는 그대로 유지하며, -f 옵션을 추가하면 cube.yaml 파일을 cube.yaml.org로 백업파일을 생성한 후 설치스크립트도 모두 삭제하게 된다.따라서, 이 명령어는 주의해서 실행해야 한다.
# cd /Desktop/cubetest

// k8s가 생성한 persistence volume과 loadbalancer를 먼저 삭제함.
// 삭제가 완료된 것을 aws console에서 확인해야 한다.
# cube destroy --pre-destroy

// k8s만 삭제하고 설치 스크립트는 그대로 유지
# cube destroy

// k8s와 설치 스크립트를 삭제하고 cube.yaml을 cube.yaml.org파일로 백업함.
# cube destroy -f
삭제한 후에 다시 설치하기 위해서는 cube init 명령을 통해 설치 스크립트를 다시 다운로드 받은 후 설치하면 된다.
Shooting Trouble
1.Docker 설치되어 있지 않은 경우
MinHoui-MacBook-Pro:cubetest minhona$ cube init -p minikube
Current Working directory : /Users/minhona/Desktop/cubetest
Checking pre-requisition [darwin]
exec: "docker": executable file not found in $PATH
docker is not found. please install docker before proceeding
Visit https://store.docker.com/editions/community/docker-ce-desktop-mac
다운로드 링크로 이동하여 Docker 설치 후 cube를 재실행 한다.
2.Queta 수가 초과됐을할 경우
Error: Error applying plan:

2 error(s) occurred:

* azurerm_virtual_machine.worker[0]: 1 error(s) occurred:

* azurerm_virtual_machine.worker.0: compute.VirtualMachinesClient#CreateOrUpdate: Failure responding to request: StatusCode=409 -- Original Error: autorest/azure: Service returned an error. Status=409 Code="OperationNotAllowed" Message="Operation results in exceeding quota limits of Core. Maximum allowed: 10, Current in use: 10, Additional requested: 2. Please read more about quota increase at http://aka.ms/corequotaincrease."
* azurerm_virtual_machine.worker[1]: 1 error(s) occurred:

* azurerm_virtual_machine.worker.1: compute.VirtualMachinesClient#CreateOrUpdate: Failure responding to request: StatusCode=409 -- Original Error: autorest/azure: Service returned an error. Status=409 Code="OperationNotAllowed" Message="Operation results in exceeding quota limits of Core. Maximum allowed: 10, Current in use: 10, Additional requested: 2. Please read more about quota increase at http://aka.ms/corequotaincrease."

Terraform does not automatically rollback in the face of errors.
Instead, your Terraform state file has been partially updated with
any resources that successfully completed. Please address the error
above and apply again to incrementally change your infrastructure.
https://docs.microsoft.com/en-us/azure/azure-supportability/resource-manager-core-quotas-request 공식링크의 방법에 따라 quota를 늘린 후, 재실행한다.