Cocktail Installation to Azure on mac,linux
The procedure for installing Cocktail onAzure cloudis as follows.
Preparations
The following programs must be installed before installing Cocktail. Otherwise, an error will occur.
1) Set the environment variable path so that the provided Cube binary can be used in any directory.
2) Download and install Docker
https://store.docker.com/editions/community/docker-ce-desktop-windows
3) Make a note of the Azure account and application-related values as shown below.
- Subscription_Id: Check the subscriptionlD value under Home > Subscriptions

- TenantId : Among the values contained under Home > Azure Active Directory > App Registrations > Endpoints > OAUTH2.0 AUTHORIZATION, the item indicated by an 'X' is the TenantId as shown in the below example.)
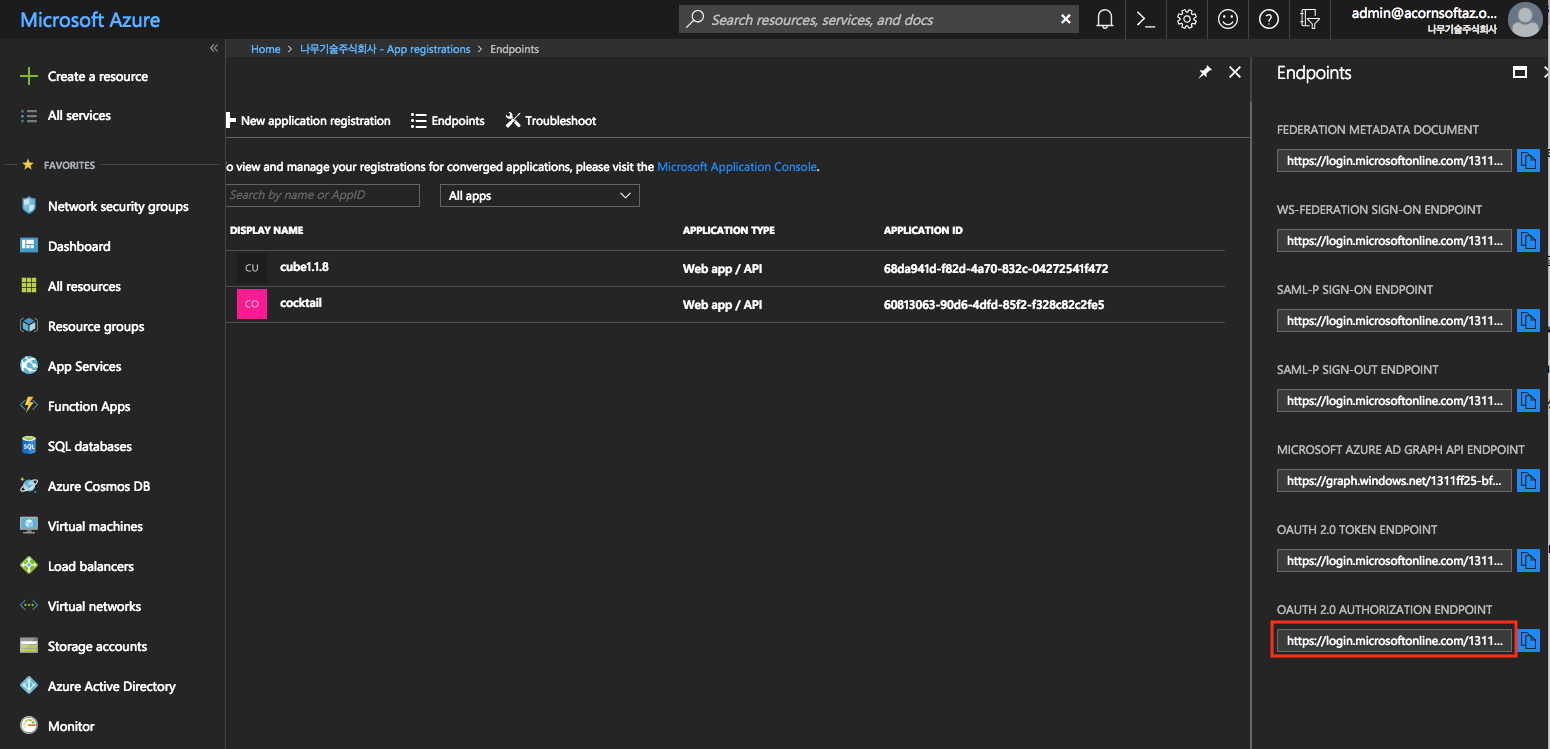
(EX : https://login.microsoftonline.com/xxxxxxxx-xxxx-xxxx-xxxx-xxxxxxxxxxxx/oauth2/authorize )
- Registering the application lD to get the client ID value
Select [+ New Application Registration] under Home > Azure Active Directory > App Registrations.
Select 'Web app/API' for ‘Application Type’ and enter http://cocktail.acornsoft.io (example) as the sign-on URL (provided service URL)
As shown below, the application ID is the client ID value in the detailed registered application screen.

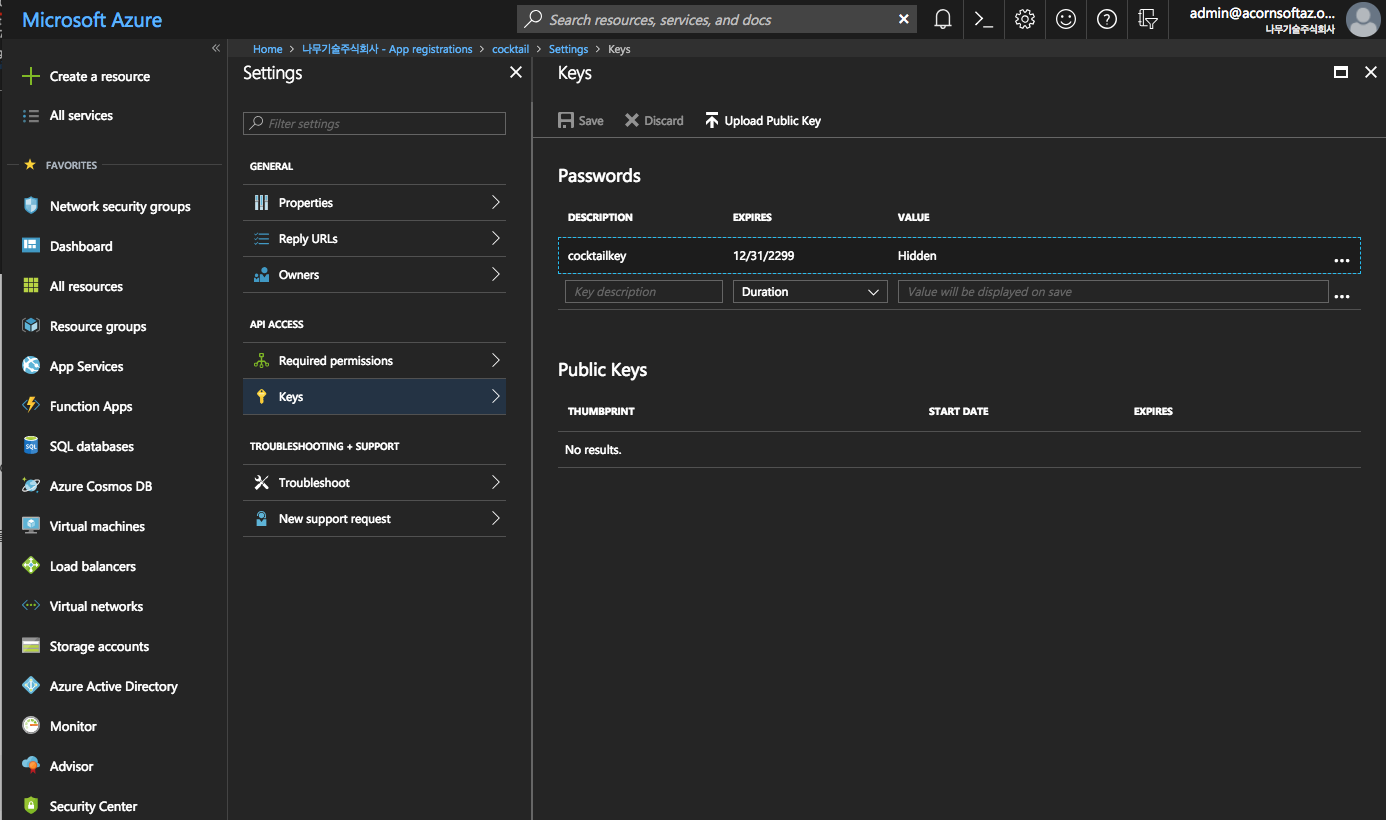
- Obtaining the client_secret value
Select the previously-registered application name under Home > Azure Active Directory > App Registrations and click the [Settings] button at the top
Select the Keys menu
description: cocktail_key
expires: Select 'Never Expires' under ‘Expires’ and click the [Save] button. The value that is automatically displayed is the client_secret value.
- Setting application permissions
Click the [+ Add] button at the top of the screen from Home > Subscription > Registered Account > Access Control (IAM) ㅤ
Role: Select 'Contributor' under ‘Role'
Assign access to: Select 'Azure User, Group, or Application' under ‘Assign Access To’
Select: Enter the previously-registered application name under 'Select'
Installation
1.Create an empty directory for installation and move to that directory.
  # mkdir /Desktop/azure
  # cd /Desktop/azure
2.Use the cube command to download and initialize the azure installation script.
# cube init -p azure
3.Open the cube.yam file with an editor and enter the information of the Azure server and instance to be installed.
---
cloud_provider: "azure"

# (required) The location string.
location: "koreacentral"

# (Required) It used as resource group name and prefix to all resources
# alphanumeric characters, periods, underscores, hyphens and parenthesis allowed
resource_prefix: "cube-v198-01"

# (optional) Instance size for the master node(s). Default: Standard_F2s.
master_vm_size: "Standard_F4s"

# (optional) Instance size for the worker node(s). Default: Standard_F2s.
worker_vm_size: "Standard_F2s"

# (required) The number of master nodes to be created. Example: 2
master_node_count: 1

# (required) The number of worker nodes to be created. Example: 3
worker_node_count: 1

# (required) Storage account type. Example: Standard_LRS
storage_account_type: "Standard_LRS"

# (required) ssh username to access server.
ssh_user_id: "cocktail"

# (required) Absolute Path to an SSH private key file to access server.
private_key_path: "/path/to/ssh_private_key"

# (required) Absolute Path to an SSH public key file to be provisioned as the SSH key.
key_path: "/path/to/ssh_public_key"

# Kubernetes
k8s_version: "1.9.8"
cluster_name: "cube"
domain_name: "acornsoft.io"
addons:
  cm: false # cocktail + prometheus monitoring(without grafana)
  km: false # kube dashboard + prometheus monitoring(with grafana)

# Prometheus Rule Language - en, ko, jp
alertmsg_lang: "en"

# (required) The unique cluster id. Equal or less than 50 characters.
cluster_id: "cluster_1234567896"
As shown above, private_key_path and key_path are private and public SSH key paths, respectively, for accessing servers and require the corresponding paths to be entered. If the keys already exist, simply enter the corresponding paths. To generate new keys, follow the procedure below.
< Generating New SSH Keys >
ㅤRefer to "Create and add private & public SSH keys" section in Overview
4.Install Cocktail on actual VM using the cube create command.
# cube create
5.If the installation completes without errors, access the master device via SSH and verify that the containers that constitute cocktail-system is running normally.
# ssh -i ~/cube/pki/id_rsa root@{master1_ip}
# watch -n1 "kubectl get pods -n cocktail-system"ㅤ
6.Check Cocktail Cloud access URL.
You can access the Master node and verify the Cocktail website URL and port using the following command.
# kubectl get service -n cocktail-system -o wide | grep cocktail-client-loadbalancer
Choose cocktail-system for namespace and select cocktail-client-loadbalancer from the Services menu.
Delete
- Deletion is performed via the below command.
If an option is not provided by default, only generated k8s clusters are deleted and installation scripts remain intact. If the -f option is added, however, installation scripts are also deleted after creating a backup of the cube.yaml file to cube.yaml.org.
Therefore, this command must be run with caution.
# cd /Desktop/cubetest

// Deletes k8s-generated persistent volumes and load balancers first.
// Deleted items must be verified via Azure console.
# cube destroy --pre-destroy

// Only deletes k8s and keeps installation scripts intact
# cube destroy

// k8s와 설치 스크립트를 삭제하고 cube.yaml을 cube.yaml.org파일로 백업함.
# cube destroy -f
Deletes k8s and installation scripts and backs up cube.yaml to cube.yaml.org.
Troubleshooting
1.If Docker is not installed
MinHoui-MacBook-Pro:cubetest minhona$ cube init -p minikube
Current Working directory : /Users/minhona/Desktop/cubetest
Checking pre-requisition [darwin]
exec: "docker": executable file not found in $PATH
docker is not found. please install docker before proceeding
Visit https://store.docker.com/editions/community/docker-ce-desktop-mac
Use the download link to install Docker and then restart Cube.
2.If the quota is exceeded
Error: Error applying plan:

2 error(s) occurred:

* azurerm_virtual_machine.worker[0]: 1 error(s) occurred:

* azurerm_virtual_machine.worker.0: compute.VirtualMachinesClient#CreateOrUpdate: Failure responding to request: StatusCode=409 -- Original Error: autorest/azure: Service returned an error. Status=409 Code="OperationNotAllowed" Message="Operation results in exceeding quota limits of Core. Maximum allowed: 10, Current in use: 10, Additional requested: 2. Please read more about quota increase at http://aka.ms/corequotaincrease."
* azurerm_virtual_machine.worker[1]: 1 error(s) occurred:

* azurerm_virtual_machine.worker.1: compute.VirtualMachinesClient#CreateOrUpdate: Failure responding to request: StatusCode=409 -- Original Error: autorest/azure: Service returned an error. Status=409 Code="OperationNotAllowed" Message="Operation results in exceeding quota limits of Core. Maximum allowed: 10, Current in use: 10, Additional requested: 2. Please read more about quota increase at http://aka.ms/corequotaincrease."

Terraform does not automatically rollback in the face of errors.
Instead, your Terraform state file has been partially updated with
any resources that successfully completed. Please address the error
above and apply again to incrementally change your infrastructure.
Increase the quota according to the official method https://docs.microsoft.com/en-us/azure/azure-supportability/resource-manager-core-quotas-request and restart.